Hopefully some of you will already have headed over to The Social PaperCrafter online magazine and read most of this article before but as the Stamparatus is going to be available to order in just 7 days time I wanted to re share in full my review of the Stamparatus created by Stampin Up.
Forget everything you know already about stamp positioning
tools and read this honest review of the new Stamparatus written by someone who
thought all stamping tools (other than my trusty stamp-a-ma-jig of course!)
were a waste of money.
Many of you will have heard of the various stamp positioning
tools already on the market, perhaps you even own a MISTI or the Tom Holtz
stamping platform (or both). I’ll be honest, I’d heard of them, even looked at
a couple on the web but I couldn’t work out what all the fuss was about. The
only reason I was tempted was the fact that I could possibly achieve better
results with my multi step stamps but didn’t think it was worth the expense
just for that reason. I thought it was just another gimmicky tool to spend my
money on that I could live without, I was perfectly happy using my
stamp-a-ma-jig to line up my stamps. That was until I was lucky enough to go to
OnStage, which is a Stampin’ Up! Demonstrator only event, where I watched a
video of Sara Douglas introducing their brand new stamp positioning tool, the
Stamparatus. My first thought while watching the video was oh, not another one,
very quickly followed by I don’t want one, I NEED one. Was it just the
excitement of the event, the hype of a brand new tool to play with or would
this product change the way I craft?
So what is
the Stamparatus?
The Stamparatus has been a long time in the making and has
been designed by crafters for crafters to allow precision stamping and to stamp
multiples quickly and precisely. The base is a neat 20.3 cm x 20.3 cm x 2 cm,
which means it won’t take up all of your workspace. It has two open sides allowing
you to stamp pieces of card that are larger than the base and the two remaining
sides hold reversible plates, giving you four sides to stamp with. On two sides
of the base there are rulers for quick measuring and both the base and stamping
plates have grid lines on to help align stamps perfectly every time. The entire
base is magnetic, meaning you can put your card anywhere on the base to hold it
in place with the magnets included. On the reverse of the Stamparatus are
rubber feet to stop it from slipping around your work surface and this is also
where you can store the two incredibly strong magnets. Also included with the
tool is a foam mat which means that you can use the Stamparatus for both
clear-mount rubber and photopolymer stamps.
My turn to play…
I had previously purchased a stamp set called Baby Bear in
which the bear is made up of three layers built up in various colours, I had
tried on several occasions to use this set but was never fully happy with the
results. As the set is photopolymer you can see through to line it up but it
was never perfect, you could always see where it wasn’t quite lined up as it
should be and so the set went back on my shelf. Where the set is photopolymer I
used the foam mat and lined my card stock up in the corner of the base plate. I
used one magnet to hold the foam mat down and the second to hold the card stock
in place, I then placed the first layer of the bear face down on the card and
pushed the plate down gently to pick up the stamp. It picked up most of the
bear well but the part of the bear in the corner hadn’t been picked up fully, I
laid the plate back down and tried again, putting more pressure on that corner
but it still wasn’t picking it up fully. Even I could tell that when I inked up
my stamp it wasn’t going to stamp properly. So I moved my card into the centre
of the base to try again. This time the plate picked the entire stamp up
perfectly, I then inked my stamp and closed the plate over the card again. When
I lifted the plate I was pleasantly surprised that my image had stamped really
clearly onto the card and I had not transferred across any of the ink that I’d
managed to get on the plate when inking the stamp. A big bonus for the messy
crafter.
I then took the second image for the bear and placed this
directly onto my card to line it up with the image already stamped down, I used
the second plate to pick this image up, ink it and stamp back down. The second
layer of the bear had been stamped perfectly on top of the first. I hadn’t had
to put a lot of pressure onto the plates to get my image to stamp perfectly
which means that this will be a great tool for my customers who sometime
struggle holding the blocks or to get a crisp image because they can’t apply
pressure. Excited at this point, I flipped one of the plates round so that I
could pick up and stamp the third image and when I lifted it up I realised that
for the first time since buying the stamp set there was no shadow around the
edge of the bear like I usually get when I free hand stamp. I’m not embarrassed
to say that I clapped in excitement like a child on their birthday. Not only
was it a perfect image for the first time ever but I could go back and do it
again and again without having to change blocks for each layer, I could do all
three in quick succession by a simple flip round of the plate!
The above image was created free hand with stamping blocks and the below image was created using my Stamparatus, isn't he perfect?
The other aspect of the Stamparatus that I wanted to try out
was something that is being called the hinge step technique, as I haven’t seen
this done with any of the other stamp positioning tools on the market. As the
two stamping plates are reversible they are not fixed in place which means not
only can you take them out to flip them round you can move them up or down a
hinge. This means that you can create a repeating pattern without having to
keep moving your card stock or repositioning the stamp on the plate.
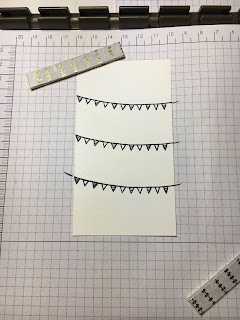
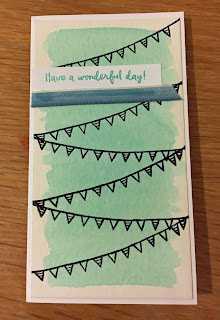
To create my card I used a banner image which I placed on
the card where I wanted the top sweep to be, I then inked the image and stamped
down. Then I lifted the plate out of the hinges and positioned it one hinge
down from its original position, reinked and stamped again. At this point I
learnt that if I didn’t get the impression on the paper I wanted, either
because I hadn’t inked up the stamp enough or I hadn’t put enough pressure on
the back of the plate, I could just re ink and stamp again without it leaving
any trace of the fact that I had to stamp it twice. I continued doing this
until I had reached the bottom of my card. At which point I repositioned the
stamp on my card to sweep across in the opposite direction and repeated the
hinge steps until my banners swept all the way down my card. It’s best to clean
the stamp before repositioning it so that you don’t end with finger prints on
your card. I only had to change the position of the stamp once and hadn’t
needed to move my card stock at all.
Conclusion
Will I be giving away my stamp-a-ma-jig? No, not yet, but
will I continue using the Stamparatus? Yes definitely, it allows me to create
perfect multi step images with ease and saves time when I want to create
multiple consistently crisp, clean images. As with any stamping product there
are pros and cons, with this one in particular you have to be really careful
not to let the incredibly strong magnets snap together as they will easily
break and if you want to stamp right to the edges of your card stock you can’t
have it lined up in the corners of the tool. However in my opinion the pros far
out weigh the cons, I think this tool is well worth the money and should be
part of every stampers tool kit. I really wish I had had this tool when I was
completing my Christmas card orders last year, I could have saved a lot of time
and money.


No comments:
Post a Comment