Showing posts with label Handmade card. Show all posts

Saturday, 5 May 2018

5 ways with Beautiful Day

Welcome back to another Saturday inspiration post, this week I am sharing with you one of my articles from The Social Papercrafter magazine. If you're not sure what I'm talking about take a look at my blog post from Tuesday where I shared the exciting news that I have been asked to be a Papercraft Artist for Create with Cayleigh's online magazine.

Do you ever struggle to choose which stamp sets to buy? Or do you buy so many that you have sets sat on your shelves for ages that you’ve never touched? If either of these sound like you then you need to try Create with Cayleigh's 5 ways strategy. Cayleigh suggests that when choosing which products to buy you should try to come up with 5 ways you will be able to use them before parting with your money. That way you know that you’ll definitely get the most out of your purchases. Obviously, there will be some products that you just NEED so you don’t have to do this for everything but it will help with those ‘not sure’ purchases. In Cayleigh’s latest Facebook live for Stampin’ Up! demonstrators she challenged us all to come up with five ways to use our products. As I have a few, ok a LOT, of stamp sets sat on my shelf that I have bought because I liked them but then haven’t touched them, I thought it was about time I took up this challenge.

Today I am showing 5 makes using the stamp set ‘Beautiful Day’ by Stampin’ Up! As this set only has two main images, two sentiments and a small dot image I thought it was going to be tricky to come up with 5 different things to make but it was surprisingly easy once I got started. I now have plenty of ideas buzzing round in my head, so this was a good purchase! All the makes featured this month have been created using the Beautiful You stamp set and any additional supplies I have used are listed.
Stampin Up Beautiful Day

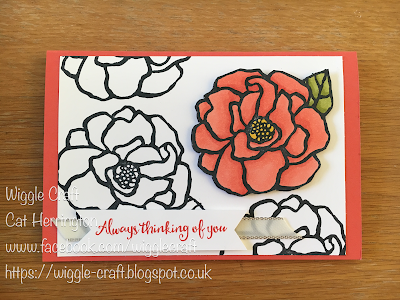
      Have a bright focal point. The main piece has been stamped in black and white, then an additional flower that has been coloured in is then popped up on foam pads to make it really stand out. 

Extra supplies: Tuxedo Black Memento Pad, Old Olive Stampin’ Blends Combo Pack, Calypso Coral Stampin’ Blends Combo Pack, Calypso Coral ink and card stock

Stampin Up Beautiful Day

With big open images that are just waiting to be coloured why not create your own patterned paper? This colourful card has been made by stamping a strip of white card using the Tuxedo Black Memento Pad and then colouring the flowers in with Stampin’ Blends. I also coloured in the areas around the flowers as I wanted the white based sentiment to pop out. 

Extra supplies:  Tuxedo Black Memento Pad, Rich Razzleberry Stampin’ Blends Combo Pack, Soft Sky Light Stampin’ Blend, Soft Sky ink and card stock.  

Stampin Up Beautiful Day

Produce clean and simple cards in minutes with a brightly coloured butterfly or flower layered onto a white base piece, it makes the image really stand out. To colour my butterfly I have used the quick and simple baby wipe swipe technique making this one a super quick card. 

Extra supplies: Baby wipes, Tuxedo Black Memento Pad, Melon Mambo, Pacific Point and Fresh Fig ink refills.

Stampin Up Beautiful Day

The images and sentiments in this stamp set lend themselves perfectly to making beautiful tags for presents. You could even make a tag that coordinates with the birthday card or make your own gift packaging to attach the tag to – see I told you I now had lots of ideas buzzing round my head! 

Extra supplies: Tuxedo Black Memento Pad, Rich Razzleberry Ink, Basic Black card, Vellum and Scalloped Tag Topper Punch

Stampin Up Beautiful Day

 The final card uses a beautiful wash of colour produced by Brusho Crystal Colour over the top of a heat embossed image. I also used my aqua painters to blend the colour in further as I wanted a smooth finish for this card.  

Extra supplies: White embossing powder, Brusho Crystal Colours and Aqua Painters.

As I had so much fun creating these makes for the magazine I have decided to make this a regular monthly feature so on the first Saturday of every month I am going to be doing a '5 ways with' post. If there are any stamp sets in particular you would like featured please leave me a comment below for inspiration. I'll be back on Tuesday with another Technique Tuesday video.

Supplies:

Saturday, 7 April 2018

Sunshine and Rainbows

I really cannot believe it's Saturday already. This week has gone so fast and there's been so much to do, but I'm pretty sure that I got it all done. I'll know for sure by the end of tomorrow as it's Ethan's birthday party tomorrow afternoon. I've got some final cooking and food prep to do in the morning but the majority of it is done. I'm really glad I got organised as we were at a family wedding yesterday and I definitely did not feel like cooking when we got home today!

Stampin Up Sunshine & Rainbows and Magical Day

Today's card is one that I made for my God daughter for her birthday a couple of weeks ago, I had such fun making it and I've been told it was a hit. Once again I took out my blends to give my unicorn a bright and colourful mane, although I could have easily achieved the same look with my Stampin write markers. To colour in the body of my unicorn I used the light grey marker and the went over the top with the colour lifter which added shading without looking too grey. 

Stampin Up Sunshine & Rainbows and Magical Day

To create my clouds I used the cloud dies from the Sunshine and Rainbows bundle, then using my fine tip glue pen I placed a small amount of glue along the edge of each set of clouds. I then poured Dazzling Diamonds glitter over the glue, putting the excess back in the pot. Once the glue dried it gave a really sparkly edge to my clouds. 

Stampin Up Sunshine & Rainbows and Magical DayStampin Up Sunshine & Rainbows and Magical Day

Once my clouds were dry I then cut out my rainbow and stuck this down behind the top cloud line. You'll notice in the photo below that there is a section of rainbow missing. I hadn't realised there are 7 pieces of rainbow until I went to put them away and found the smallest band still in the pack. So I quickly cut out the smallest one and stuck it down. My clouds have all been raised up a little using foam strips which allowed me to tuck both the rainbow and the unicorn behind the clouds.

Stampin Up Sunshine & Rainbows and Magical Day

As I can't resist a bit more glitter I finished the card off by adding wink of stella to the rainbow and placed some glitter enamel dots randomly on the card. I am really pleased with how this one turned out and I hope you like it too!

Stampin Up Sunshine & Rainbows and Magical Day

Come back on Tuesday for another Technique Tuesday video but until then happy crafting!

Supplies:

Tuesday, 3 April 2018

Technique Tuesday #5 - Simplified Spotlighting

Hello and welcome back to another Technique Tuesday! I am in love with how simple yet gorgeous these cards are. The spotlighting technique is pretty simple as it is but I have simplified it further by using the beautiful Petal Passion DSP instead of stamping an image. This black and white paper is lovely on it's own but by adding a bit of colour it looks even better.


The original card I made is the one above in orange but the one in the video is the photo below. By adding a black circle behind the coloured one it really makes the colours pop, plus the shading already on the paper takes the hard work away.


To make your own you will need:
Base card  is 8 1/4" x 5 3/4"
DSP layer is 3 7/8" x 5 1/2"
Black circles are 1 1/2"
Sentiment and DSP circles are 1 1/4"

I hope you enjoy this weeks video!


Are you based in the Waterlooville area and want to have some fun crafting with others? Then why not book onto one of my classes? I have a product based class coming up on the 29th April and a technique based class on the 8th and 14th May (the same class run twice) just drop me an email csh.wiggle.craft@gmail.com to book your place!

Supplies:


Saturday, 17 March 2018

Epic Celebrations

It may be a little late in the day but it's still Saturday so it's definitely an improvement on last week! It's been a really good week crafting wise, I had my normal monthly card class on Monday night then I was given the opportunity to demo at a local WI craft group. I was incredibly nervous, I think I checked my boxes of supplies about 12 times! I wasn't 100% sure how many people were going to turn up and I had no idea about what their skill levels were so I tried to plan something that was simple but not too simple and I took enough for the maximum number of people and spares just in case. I'm really glad I did because all 12 ladies turned up, which made me even more nervous to begin with but once we got started I got into my crafting zone and began to relax. Everyone was really friendly and I'm pretty sure that most, if not all, enjoyed themselves. I came home on such a high just because I felt it went well! I'm a very emotional orientated person so when I'm on an emotional high I just want to carry on doing what I love so I carried on crafting throughout the week. Today's card is one I made for my best friend's son for his birthday, I hope he liked it!

Stampin' Up! Brushos with Epic Celebration

Both the background and the guitar were coloured in using the Brusho crystals, they are such fun to use and give some really vibrant results.  For the background I used my aqua painter to create a large wash of water which I then sprinkled the blue powder on initially, once this had mixed in with the water I sprinkled a small amount of the yellow over the top which mixed itself to form small patches of green within the blue. I then used some tissue to pick up some of the larger pools of water and left it to dry. 

Stampin' Up! Brushos with Epic Celebration

Stampin' Up! used to do a black Stampin' Emboss powder as part of their range but they no longer have this colour. As I really wanted my guitar to be outlined in black and to be embossed I tried out a simple tip that I had heard before but never tried. If you ink up your stamp using versa mark first then ink it with your chosen colour, in this case black, when you stamp it onto the paper the versa mark is at the top of the image. This means that it is still tacky enough to put the embossing powder onto, it worked! The reason I wanted the guitar to be embossed is so that there was a slight barrier for the water. I used my aqua painter again to 'paint' over the guitar with the water, I then sprinkled red crystals all over the guitar and as the crystals only react with the water it meant that only the guitar turned the gorgeous vibrant red.

Stampin' Up! Brushos with Epic Celebration

I fussy cut the guitar and before I stuck everything down I used my scissors to distress the edges of the water colour paper, Island Indigo layer and the sentiment. I wanted a slightly messy look rather than the clean sharp look I usually have, it worked really well with the guitar image. To finish it off I then popped up the guitar and sentiment on Stampin' Dimensionals. I'm really pleased with it!

Stampin' Up! Brushos with Epic Celebration

All of the supplies I have used to create this card are in the table below. Just so you know the stamp set I used is a sale-a-bration item so it's only available until the end of March. If you purchased the Brusho Crystal colours, Watercolor Paper and the aqua painters you can earn the stamp set for FREE! However if you purchased everything I have used to make this card not only will you earn the stamp set I have used here but you can also choose another Level 1 item for FREE! If your wish list is really long then SAB is the very best time for you to join Stampin' Up!, either as a hobby demonstrator pr a business demonstrator, your choice. You get to choose £130 of SU products for £99 which includes p&p, then becuase it's sale-a-bration you can pick two extra stamp sets of your choice. You get to join our fun group and also get a minimum of 20% discount on everything you order once you join. It's definitely worth thinking about! Get in touch if you want to know more. Until Tuesday, happy crafting! 

Supplies:


Tuesday, 13 March 2018

Technique Tuesday #2 - Sponge circle background

Hello and welcome to my second Technique Tuesday post. I am so glad that I have created all of the videos for March already as I feel so busy at the moment I don't think I would have gotten it done in time otherwise. I had my normal monthly card class last night and then tonight I am doing a class for a WI craft group. This weeks card is one of the two that I am going to be doing at class tonight, I'm really hoping they like it. The background itself is so simple to do and looks good with both the coloured images stamped over the top as I have done today or equally it would look good with some dark silhouette images over the top.

It's a very quick post from me as I need to make sure I have everything ready for tonight, enjoy!


Thank you for watching and I will be back Saturday with some more inspiration, until then happy crafting.

Supplies: