Showing posts with label Birthday card. Show all posts

Wednesday, 2 May 2018

Technique Tuesday (on a Wednesday) #9 - Stained Glass

I'm back again with another technique video for you, as I said in my post yesterday it would be a day late as I didn't want to wait any longer to announce my exciting news. If you missed it check it out here.

Stampin Up Lift Me Up

This weeks card has been made using the technique called stained glass and it uses Stampin' Write markers with some vellum. As you can see in the photo below you colour in different areas of the vellum and with the black outline it looks similar to a stained glass window.

Stampin Up Lift Me Up

The overall effect is stunning and so easy to achieve! I chose to layer my finished image onto a piece of pool party cardstock to make it look like the balloon is up in the sky.

Stampin Up Lift Me Up

Check out how I made my card in the video below, don't forget to head over to my YouTube channel and hit subscribe!


Supplies:


Product List
Lift Me Up Clear-Mount Bundle
[144712]
£41.25

Saturday, 7 April 2018

Sunshine and Rainbows

I really cannot believe it's Saturday already. This week has gone so fast and there's been so much to do, but I'm pretty sure that I got it all done. I'll know for sure by the end of tomorrow as it's Ethan's birthday party tomorrow afternoon. I've got some final cooking and food prep to do in the morning but the majority of it is done. I'm really glad I got organised as we were at a family wedding yesterday and I definitely did not feel like cooking when we got home today!

Stampin Up Sunshine & Rainbows and Magical Day

Today's card is one that I made for my God daughter for her birthday a couple of weeks ago, I had such fun making it and I've been told it was a hit. Once again I took out my blends to give my unicorn a bright and colourful mane, although I could have easily achieved the same look with my Stampin write markers. To colour in the body of my unicorn I used the light grey marker and the went over the top with the colour lifter which added shading without looking too grey. 

Stampin Up Sunshine & Rainbows and Magical Day

To create my clouds I used the cloud dies from the Sunshine and Rainbows bundle, then using my fine tip glue pen I placed a small amount of glue along the edge of each set of clouds. I then poured Dazzling Diamonds glitter over the glue, putting the excess back in the pot. Once the glue dried it gave a really sparkly edge to my clouds. 

Stampin Up Sunshine & Rainbows and Magical DayStampin Up Sunshine & Rainbows and Magical Day

Once my clouds were dry I then cut out my rainbow and stuck this down behind the top cloud line. You'll notice in the photo below that there is a section of rainbow missing. I hadn't realised there are 7 pieces of rainbow until I went to put them away and found the smallest band still in the pack. So I quickly cut out the smallest one and stuck it down. My clouds have all been raised up a little using foam strips which allowed me to tuck both the rainbow and the unicorn behind the clouds.

Stampin Up Sunshine & Rainbows and Magical Day

As I can't resist a bit more glitter I finished the card off by adding wink of stella to the rainbow and placed some glitter enamel dots randomly on the card. I am really pleased with how this one turned out and I hope you like it too!

Stampin Up Sunshine & Rainbows and Magical Day

Come back on Tuesday for another Technique Tuesday video but until then happy crafting!

Supplies:

Saturday, 31 March 2018

Last day of sale-a-bration - You are loved

Happy Saturday everyone, I hope you're all enjoying the long weekend? We're having a bit of a relaxing one today as we were out most of yesterday and will be spending all of tomorrow with family. The boys are really excited about tomorrow as they love spending time with all of the family, plus they know there's going to be lots of chocolate so that's always a bonus in their eyes. 

Stampin' Up! Blossoming Basket

It's been a really lovely weekend so far and I've got tonnes of crafting done which always puts me into a good mood! As you can see from the below photo when I get into a good crating mood I also get really messy, I'm getting better at tidying after I finish each make, however last time I had a big tidy I then couldn't find my foam strips for about a week! 

If you want to get this good mood feeling too you don't want to miss out on sale-a-bration, there's less than 24 hours left to either get those awesome freebies or to take advantage of the amazing joining offer. Sale-a-bration really is the best time to join Stampin' Up!, you pay £99 then not only do you get to choose £130 of products but you also get to pick TWO other stamp sets, which depending on which two you choose could be another £90 worth of stamp sets. That's a total of up to £220 of products for £99!! You really don't want to be waking up tomorrow morning feeling like you've missed out. 

Stampin' Up! Blossoming Basket


Today's card has been created using two of the freebies on offer, the basket stamp set also comes with a basket weave embossing folder which I haven't used on this card as I wanted to create my own patterned panels using stamps from the two sets I chose. I think this stamp set is simply beautiful and was the perfect fit for Craig's Nana's birthday card. The inspiration for this card came from Pinterest as I saw a card created with this style of fold and decided to replicate it using the basket stamp. The idea is that when the card is folded over, the front image covers up the written sentiment and then when opened you can see another decorated panel and the sentiment. I'm really happy with how this turned out and I really hope she likes it!

Stampin' Up! Blossoming Basket

The basket of flowers were coloured in using my blends, I really can't get enough of these wonderful pens. They make achieving great results so easy! I stamped the butterfly and tag on a separate scrap of whisper white so that I could cut them out and pop them up on mini dimensionals. I then used my wink of stella to add a bit of sparkle to the butterfly. To finish it off I mounted the panel onto Powder Pink card stock then wrapped some Fresh Fig ribbon round and tied a small bow. To make sure my bow didn't move or come undone I stuck it in place with a glue dot and then added a small amount of glue using the fine tip glue pen over the top of the bow.

Stampin' Up! Blossoming Basket

To make the card base I first folded it in half then folded the left side in half again. Once I had stuck down the two stamped panels, I glued in place the area that I will write my sentiment on. Then with the left side folded over the top I was able to lay the basket image down so that it covers up the inside panel, this allowed me to see exactly where it needed to be glued down.  

Stampin' Up! Blossoming Basket

I know it possibly sounds complicated when reading it on my blog but this card was actually really simple to make and so much fun to do. There's a small part of me that doesn't want to give it away as I just want to keep looking at it but then I wouldn't be sharing what I love! 

Please do get in touch if you have any questions about the joining offer I mentioned above or if you want to place an order to get some of those freebies. I hope you have a great weekend, happy crafting!

Supplies:


Saturday, 17 March 2018

Epic Celebrations

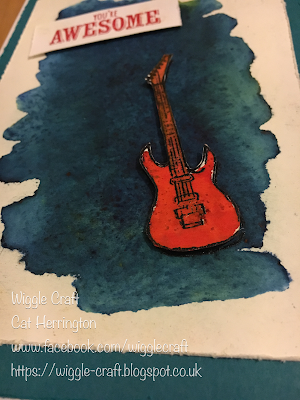
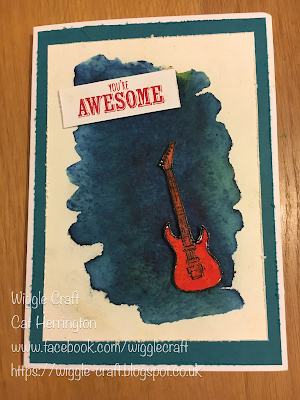
It may be a little late in the day but it's still Saturday so it's definitely an improvement on last week! It's been a really good week crafting wise, I had my normal monthly card class on Monday night then I was given the opportunity to demo at a local WI craft group. I was incredibly nervous, I think I checked my boxes of supplies about 12 times! I wasn't 100% sure how many people were going to turn up and I had no idea about what their skill levels were so I tried to plan something that was simple but not too simple and I took enough for the maximum number of people and spares just in case. I'm really glad I did because all 12 ladies turned up, which made me even more nervous to begin with but once we got started I got into my crafting zone and began to relax. Everyone was really friendly and I'm pretty sure that most, if not all, enjoyed themselves. I came home on such a high just because I felt it went well! I'm a very emotional orientated person so when I'm on an emotional high I just want to carry on doing what I love so I carried on crafting throughout the week. Today's card is one I made for my best friend's son for his birthday, I hope he liked it!
Stampin' Up! Brushos with Epic Celebration

Both the background and the guitar were coloured in using the Brusho crystals, they are such fun to use and give some really vibrant results.  For the background I used my aqua painter to create a large wash of water which I then sprinkled the blue powder on initially, once this had mixed in with the water I sprinkled a small amount of the yellow over the top which mixed itself to form small patches of green within the blue. I then used some tissue to pick up some of the larger pools of water and left it to dry. 

Stampin' Up! Brushos with Epic Celebration

Stampin' Up! used to do a black Stampin' Emboss powder as part of their range but they no longer have this colour. As I really wanted my guitar to be outlined in black and to be embossed I tried out a simple tip that I had heard before but never tried. If you ink up your stamp using versa mark first then ink it with your chosen colour, in this case black, when you stamp it onto the paper the versa mark is at the top of the image. This means that it is still tacky enough to put the embossing powder onto, it worked! The reason I wanted the guitar to be embossed is so that there was a slight barrier for the water. I used my aqua painter again to 'paint' over the guitar with the water, I then sprinkled red crystals all over the guitar and as the crystals only react with the water it meant that only the guitar turned the gorgeous vibrant red.

Stampin' Up! Brushos with Epic Celebration

I fussy cut the guitar and before I stuck everything down I used my scissors to distress the edges of the water colour paper, Island Indigo layer and the sentiment. I wanted a slightly messy look rather than the clean sharp look I usually have, it worked really well with the guitar image. To finish it off I then popped up the guitar and sentiment on Stampin' Dimensionals. I'm really pleased with it!
Stampin' Up! Brushos with Epic Celebration

All of the supplies I have used to create this card are in the table below. Just so you know the stamp set I used is a sale-a-bration item so it's only available until the end of March. If you purchased the Brusho Crystal colours, Watercolor Paper and the aqua painters you can earn the stamp set for FREE! However if you purchased everything I have used to make this card not only will you earn the stamp set I have used here but you can also choose another Level 1 item for FREE! If your wish list is really long then SAB is the very best time for you to join Stampin' Up!, either as a hobby demonstrator pr a business demonstrator, your choice. You get to choose £130 of SU products for £99 which includes p&p, then becuase it's sale-a-bration you can pick two extra stamp sets of your choice. You get to join our fun group and also get a minimum of 20% discount on everything you order once you join. It's definitely worth thinking about! Get in touch if you want to know more. Until Tuesday, happy crafting! 

Supplies: