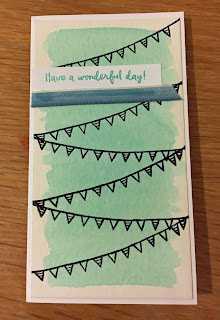
Friday 6 July 2018

It's a Beautiful Day

Hello everyone! Wow I cannot believe how long it is since I last posted, I was getting into a groove and then ummm stopped. Sorry about that. I am also sorry for how brief this post is, I was planning on having a catch up on what i've been up to and some of the amazing Stampin' Up! offers that are going on in July but unfortunately Rory has a tummy bug and has already been sick once. I'm expecting more so I'm going to have to rush this a bit.

Stampin Up Beautiful Day by Wiggle Craft

This weeks card has been inspired by two challenges. The colour challenge over at CAS Colours & Sketches and What Will You Stamp? this week are using Stampin' Up! Beautiful Day. I know I've said this before but Beautiful Day is one of my favourite stamp sets, I actually jumped out of my seat when I won this set as my prize patrol at OnStage in November last year. So when the What Will You Stamp? email landed in my inbox this week it was just the boost I needed to get crafting and posting again.

http://cascoloursandsketches.blogspot.com/2018/07/challenge-279-colours.html?utm_source=feedburner&utm_medium=email&utm_campaign=Feed%3A+CasColoursSketches+%28CAS+Colours+%26amp%3B+Sketches%29


I'm hoping my card can still been included in the CAS Colours & Sketches challenge as I don't have Highland Heather yet so I used Gorgeous Grape instead.

Stampin Up Beautiful Day by Wiggle Craft

To create my butterfly I used some black Stampin' emboss powder to emboss the outline and then picked up ink with my aqua painter to paint the wings. I have used shimmery white card stock so that I could do a little watercolour painting without it warping too much. The curl you can see in the photo is where I pulled the strip up and tried to stick it back down - never a good idea! Towards where the butterfly wings are I applied Grapefruit Grove and then added in Daffodil Delight towards the edges. They really go well together.

Stampin Up Beautiful Day by Wiggle Craft

To finish off the card I used Daffodil Delight to stamp a random pattern with the circles in the set and then my sentiment in Gorgeous Grape.

Stampin Up Beautiful Day by Wiggle Craft

Again I'm sorry for how brief this post is, especially as it has been so long but I hope you like what I've shown you today. All of the supplies I have used are below and these link straight through to my online shop where you can purchase supplies 24/7.

Supplies:


Sunday 27 May 2018

May RAK Blog Hop

Welcome to the Random Act of Kindness (RAK) Blog Hop, you're getting an extra post from me this week (aren't you lucky!) as I wanted to take part in this months hop. You are visiting Cat Herrington in England and I am showcasing the cards I have given & received as part of the Random Act of Kindness Group on Facebook. 

Each month, we each select a few people from the Group to send a RAK card to, to brighten their day. Please feel free to join the Group if you would like to participate in the RAK cards movement (blogging is not mandatory). If you would like to join our awesome group here is the link to the group - https://www.facebook.com/groups/randomactsofkindnessgroup/
#imbringingRAKcardsback #makeacardsendacard #randomactsofkindness

These are the cards I have made. 


These are the wonderful RAK birthday cards I have received from Deb Wallace, Amanda Edens, Crystal, Clare, Fiona Stenten, Leah Mo and Sue Sikacek.


I hope the projects you've seen here on my blog today have inspired you & brightened your day. You are currently visiting Cat Herrington. Please see the list below & hop around all of the people on the list to see all our projects. You don't want to miss any!


Saturday 26 May 2018

A review of the brand new Stamparatus

Hopefully some of you will already have headed over to The Social PaperCrafter online magazine and read most of this article before but as the Stamparatus is going to be available to order in just 7 days time I wanted to re share in full my review of the Stamparatus created by Stampin Up.

Forget everything you know already about stamp positioning tools and read this honest review of the new Stamparatus written by someone who thought all stamping tools (other than my trusty stamp-a-ma-jig of course!) were a waste of money.

Many of you will have heard of the various stamp positioning tools already on the market, perhaps you even own a MISTI or the Tom Holtz stamping platform (or both). I’ll be honest, I’d heard of them, even looked at a couple on the web but I couldn’t work out what all the fuss was about. The only reason I was tempted was the fact that I could possibly achieve better results with my multi step stamps but didn’t think it was worth the expense just for that reason. I thought it was just another gimmicky tool to spend my money on that I could live without, I was perfectly happy using my stamp-a-ma-jig to line up my stamps. That was until I was lucky enough to go to OnStage, which is a Stampin’ Up! Demonstrator only event, where I watched a video of Sara Douglas introducing their brand new stamp positioning tool, the Stamparatus. My first thought while watching the video was oh, not another one, very quickly followed by I don’t want one, I NEED one. Was it just the excitement of the event, the hype of a brand new tool to play with or would this product change the way I craft?

 So what is the Stamparatus?


The Stamparatus has been a long time in the making and has been designed by crafters for crafters to allow precision stamping and to stamp multiples quickly and precisely. The base is a neat 20.3 cm x 20.3 cm x 2 cm, which means it won’t take up all of your workspace. It has two open sides allowing you to stamp pieces of card that are larger than the base and the two remaining sides hold reversible plates, giving you four sides to stamp with. On two sides of the base there are rulers for quick measuring and both the base and stamping plates have grid lines on to help align stamps perfectly every time. The entire base is magnetic, meaning you can put your card anywhere on the base to hold it in place with the magnets included. On the reverse of the Stamparatus are rubber feet to stop it from slipping around your work surface and this is also where you can store the two incredibly strong magnets. Also included with the tool is a foam mat which means that you can use the Stamparatus for both clear-mount rubber and photopolymer stamps.


My turn to play…


I had previously purchased a stamp set called Baby Bear in which the bear is made up of three layers built up in various colours, I had tried on several occasions to use this set but was never fully happy with the results. As the set is photopolymer you can see through to line it up but it was never perfect, you could always see where it wasn’t quite lined up as it should be and so the set went back on my shelf. Where the set is photopolymer I used the foam mat and lined my card stock up in the corner of the base plate. I used one magnet to hold the foam mat down and the second to hold the card stock in place, I then placed the first layer of the bear face down on the card and pushed the plate down gently to pick up the stamp. It picked up most of the bear well but the part of the bear in the corner hadn’t been picked up fully, I laid the plate back down and tried again, putting more pressure on that corner but it still wasn’t picking it up fully. Even I could tell that when I inked up my stamp it wasn’t going to stamp properly. So I moved my card into the centre of the base to try again. This time the plate picked the entire stamp up perfectly, I then inked my stamp and closed the plate over the card again. When I lifted the plate I was pleasantly surprised that my image had stamped really clearly onto the card and I had not transferred across any of the ink that I’d managed to get on the plate when inking the stamp. A big bonus for the messy crafter.

I then took the second image for the bear and placed this directly onto my card to line it up with the image already stamped down, I used the second plate to pick this image up, ink it and stamp back down. The second layer of the bear had been stamped perfectly on top of the first. I hadn’t had to put a lot of pressure onto the plates to get my image to stamp perfectly which means that this will be a great tool for my customers who sometime struggle holding the blocks or to get a crisp image because they can’t apply pressure. Excited at this point, I flipped one of the plates round so that I could pick up and stamp the third image and when I lifted it up I realised that for the first time since buying the stamp set there was no shadow around the edge of the bear like I usually get when I free hand stamp. I’m not embarrassed to say that I clapped in excitement like a child on their birthday. Not only was it a perfect image for the first time ever but I could go back and do it again and again without having to change blocks for each layer, I could do all three in quick succession by a simple flip round of the plate!

Stampin Up Baby Bear

The above image was created free hand with stamping blocks and the below image was created using my Stamparatus, isn't he perfect?

Stampin Up Baby Bear

The other aspect of the Stamparatus that I wanted to try out was something that is being called the hinge step technique, as I haven’t seen this done with any of the other stamp positioning tools on the market. As the two stamping plates are reversible they are not fixed in place which means not only can you take them out to flip them round you can move them up or down a hinge. This means that you can create a repeating pattern without having to keep moving your card stock or repositioning the stamp on the plate.

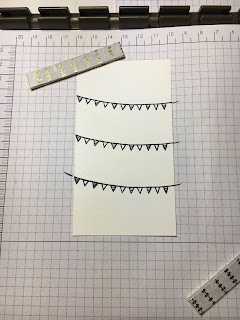
To create my card I used a banner image which I placed on the card where I wanted the top sweep to be, I then inked the image and stamped down. Then I lifted the plate out of the hinges and positioned it one hinge down from its original position, reinked and stamped again. At this point I learnt that if I didn’t get the impression on the paper I wanted, either because I hadn’t inked up the stamp enough or I hadn’t put enough pressure on the back of the plate, I could just re ink and stamp again without it leaving any trace of the fact that I had to stamp it twice. I continued doing this until I had reached the bottom of my card. At which point I repositioned the stamp on my card to sweep across in the opposite direction and repeated the hinge steps until my banners swept all the way down my card. It’s best to clean the stamp before repositioning it so that you don’t end with finger prints on your card. I only had to change the position of the stamp once and hadn’t needed to move my card stock at all.
Stamparatus Hinge Step

Stamparatus Hinge Step

Stamparatus Hinge Step

Conclusion


Will I be giving away my stamp-a-ma-jig? No, not yet, but will I continue using the Stamparatus? Yes definitely, it allows me to create perfect multi step images with ease and saves time when I want to create multiple consistently crisp, clean images. As with any stamping product there are pros and cons, with this one in particular you have to be really careful not to let the incredibly strong magnets snap together as they will easily break and if you want to stamp right to the edges of your card stock you can’t have it lined up in the corners of the tool. However in my opinion the pros far out weigh the cons, I think this tool is well worth the money and should be part of every stampers tool kit. I really wish I had had this tool when I was completing my Christmas card orders last year, I could have saved a lot of time and money.

Tuesday 22 May 2018

Technique Tuesday #11 - String Pull

This blog post needs to come with a warning, this technique is highly addictive and I will not be held responsible for the loss of many hours crafting. I also recommend letting someone know where you are going so that they can send regular refreshments or a search party if you do not return from your crafting space.

Stampin Up String Technique

I am now in love with this technique but I am not 100% sure what to call it so at the moment it is the string pull technique. I first saw this in a video on Facebook where they took a piece of string covered in ink, placed this between the pages of a book and pulled. This produced a gorgeous image and Stampin Up demos have gone crazy over it. 

Stampin Up String Technique

I have seen sample after sample of this pop up in my news feed and I just had to give it a go myself. What I really love about it, other than its simplicity, is that each one is unique. The photo above and below have used the same bit of bakers twine and the same colour ink but have created a different image depending on how I lay the twine and how much ink was soaked up.

Stampin Up String Technique

Now that you have seen a couple of examples take a look at my video which shows you have I've made them. Once you've watched it scroll on down for some more examples - I did warn you it's addictive.


I promise you it really is as easy as it looks, if you don't have a stamparatus don't worry you can sandwich you card stock in a book (just be weary of the ink staining through) or any other object that you can apply even pressure too. 

Stampin Up String Technique

For the card above I tried out Berry Burst re-inker and laid the bakers twine a bit looser. The photo below shows what you can achieve if you use two colours. I dipped the top half of the twine in Bermuda Bay ink and the bottom half in Berry Burst. I still left myself some dry twine at the end to pull and as you can see it gives a really lovely result where the colours join and mix.

Stampin Up String Technique

I can't decide whether the multi coloured image above is my favourite or the one below where I have created a large Lemon Lime Twist swirl with a smaller Berry Burst swirl either side.

Stampin Up String Technique

Yes, I think this one might be my favourite.

Stampin Up String Technique

Let me know which one is your favourite by leaving me a comment below. Thank you for stopping by my blog today, don't forget to head over to my YouTube channel and hit subscribe to know as soon as I upload another video. 

Supplies:

Tuesday 15 May 2018

Technique Tuesday #10 - Treat Pouch

Hello and welcome back to another Technique Tuesday. I don't know about where you are but here in Waterlooville in the UK we have got some gorgeous sunshine. Weather like this always seems to put a smile on people's faces and everyone seems so much happier, hopefully it will last!

Stampin Up Envelope Punch Board

This week I wanted to share a little something that you could use to put a smile on someone’s face. I made these little treat pouches as table gifts for my kit class attendees and then showed my monthly class ladies how to make them last night. They are so quick and simple, you could make them up and leave them one on someone’s desk at work to brighten up their day. 

Stampin Up Envelope Punch Board

I hope you can see from the video how gorgeous this paper is as the photos just don’t do it justice!


Supplies:

Saturday 12 May 2018

Kids Corner #1

Those of you that know me already or follow me on social media will know that I have two wonderful boys, Ethan and Rory, that mean the world to me. Yes, they can be a handful and often they make me want to scream and pull my hair out but I wouldn’t have them any other way. Ethan loves to join me with one of my other passions, crafting, whenever he can. He always prefers using my craft supplies as he thinks they’re special, this is probably to do with the fact that I have so much he always manages to find something new to try. So when Ethan came home from school with homework to make a dinosaur I thought this was a perfect opportunity for us to craft together.

This is a fun and simple project to make, Ethan took longer choosing which colours he wanted to use than actually making the dinosaur! If you would like to have a go at making your own dinosaur at home you will need some paper plates, a cardboard tube, inks, double sided tape, sponge brayers and a pattern based stamp set (we used Playful Backgrounds from Stampin’ Up!) I would also recommend covering your surface with a table cloth as the fun could get a bit messy!

Stampin Up Playful Backgrounds

To start with Ethan used the sponge brayers to transfer blue ink onto one of the paper plates, covering the entire surface. He then used the same ink to colour the cardboard tube. In a different ink colour, Ethan chose yellow, he sponged the edge of the second paper plate.

Stampin Up Playful Backgrounds

Stampin Up Playful Backgrounds

Stampin Up Playful Backgrounds

Ethan then chose which of the pattern stamps he wanted to use and in orange and green ink he stamped the images onto the blue plate. When he was happy with his design, Ethan used his scissors to carefully cut out a head, tail and some spikes from the yellow plate. At this point I was allowed to help! I cut the cardboard tube in half and then in each half I cut two slits, one opposite the other - this is to slide the paper plate into once done so they need to be roughly the same depth on each tube half.

Stampin Up Playful Backgrounds

Stampin Up Playful Backgrounds

Using the double-sided tape Ethan stuck on the head, tail and spikes ensuring they were all on one half of the plate and sticking out from the edge. He also placed a piece of tape across the middle and around the edge of one half of the plate. With the back of the tape removed he folded the plate in half and pressed down to make sure his dinosaur stayed stuck together. I then helped Ethan to slide the paper plate into the cuts in the cardboard tube. To finish him off Ethan used a felt tip pen to draw on a cheeky face and some toes.

Stampin Up Playful Backgrounds

Stampin Up Playful Backgrounds

Ethan was really pleased with his finished dinosaur and it was lovely to see him proudly carrying it to school the next day. 

Supplies: