Sunday, 29 May 2016

Sunday Retirement Showcase - 60th Anniversary Part 1

Morning everyone, I am now back from our lovely family holiday, we had a great time in the sun, pools and water park! I apologise for the gaps in posts last week I didn't have as much time to schedule posts as I thought I would. However to make up for that fact there's going to be an extra post this week on Saturday 4th June where I am taking place in a blog hop. This is where myself and several other demos are going to be showing creations made with products from the new catalogue and there will be links on the post so you can move around the blogs to see everyone's work.

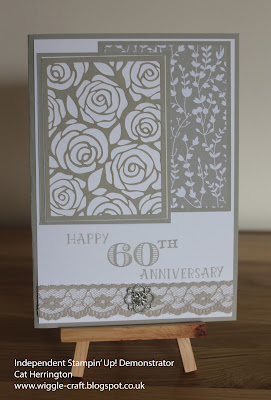
While we were away it was hubby's Grandparents 60th Wedding Anniversary, can you believe it, 60 years? When I said to hubby do you think we'll still be together for our 60th Anniversary he said we'll be lucky if we're still alive. I feel so loved! Plus we'll only be 83 so I'm hoping to still be around! Anyway, as we were going to be away I made their card and gift early. This week I will show you the card I made for them and then next week I will show you the coordinating gift.

Stampin' Up! 60th Wedding Anniversary

I started this card by digging out all of my old DSP as I had a sheet in mind that would be good for an anniversary card. However when I went looking I found this set first and realised that I had several products in the same colours that would go together really nicely.

Stampin' Up! 60th Wedding Anniversary

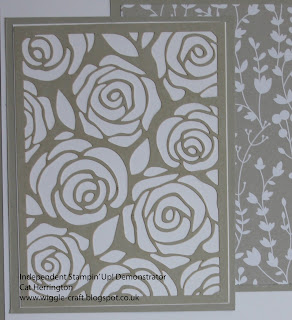
I love the cut out Rose's that came in an embellishment kit a while ago, I never got round to using it while it was current but loved it from when I first saw it. It's always the way, I buy something I love then don't find the perfect project for it for ages! Hopefully Stampin' Up! will do something similar in the future.

Stampin' Up! 60th Wedding Anniversary

Another product I bought but haven't used before is this lovely jewelled embellishment (the blurry photo doesn't do it justice) which I think if perfect for wedding or anniversary cards. Placed on top of the gorgeous lace trim just finishes the card off nicely. 

You now only have three days left to order any products on the retiring list so make sure you get anything you want before it's gone. I'll be back on Tuesday with another project showing off some of the products that will be gone by the end of the day. Thank you for stopping by to read my blog.

Supplies:


Tuesday, 24 May 2016

New 2016 colours

Morning everyone, while you are reading this I should be in sunny Menorca with my family. While I'm away I can't take part in any challenges so I thought I would take the opportunity to show off some of the new ribbon available when the catalogue comes out. This gorgeous ribbon is available in this years new in colours. When I first saw a photo of the new colours I wasn't too sure about them but now I've seen them in person and had a chance to play I love them. Even the orange, pink and green which aren't really me colours. The green might even be my favourite!

Stampin' Up! 2016-18 In Colour Ruffled Ribbon

This new ruffled ribbon is so lovely! These cards were so simple to make too, I used the Stars Framelits to cut the star out of the centre of some card. Then I used glue dots to stick down strips of the ribbon and the sentiment is from One Big Meaning which I am pleased to say is carrying over to the new catalogue even though it somehow ended up with a retired sticker on it!

So which colour is your favourite?

Flirty Flamingo?


Emerald Envy?


Peekaboo Peach?


Dapper Denim?


Or Sweet Sugarplum?


There's not long left until the new catalogue comes out and you'll be able to get your hands on these goodies yourselves. Which also means if there's anything left on the retirement list that you want you need to get them fast! Thanks for stopping by my blog today, I will be back on Thursday with another card to share with you.

Supplies:


Tuesday, 17 May 2016

Just for you

Morning all, it's a bit later than normal for me as although I had made this card ready for today's post I hadn't had a chance to photograph it. It's been a very hectic weekend filled with little sleep and a poorly little cub. This is going to be a very quick post from me as I have 10 mins before I have to get ready to take little cub swimming, I'm hoping this will cheer him up as he loves water.

Stampin' Up! Just for you

Today's card took me right out of my colour comfort zone as usually I avoid greens and oranges but these two from the new in colours coming out in the annual catalogue 1st June are just so lovely I had to give them a go. This card was so simple to make, one stamp set, two inks and two pieces of card! I do love simple cards. This card was inspired by the sketch challenge over at CAS Colours & Sketches this week. Here is the sketch:


Thank you for stopping by my blog, I'll be back on Thursday with another card for you but right now I need to quickly finish my tea and then go swimming!

Supplies:


Sunday, 15 May 2016

Sunday Retirement Showcase - Happy Ribbon

Morning all, well it's Sunday again already, time seems to be going so quickly at the moment. My boys are growing up too fast, the weeks are flying by, getting closer and closer to when I have to go back to work! Hmmmm not a happy thought! It is also getting closer to the 31st May which means you don't have long left to get those items on the retirement list before they are gone for good. A happier point is that it's getting closer and closer to when the new catalogue comes out, I am loving some of the new items and already have a wish list as long as my arm. If you would like a copy of the catalogue just drop me and email and I will get one in the post to you when they become available.

So as part of my mega tidy up in my craft space I bought a ribbon box as I have lots of reels and I hardly ever use them because I just can't see them. So now most (I hadn't realised how many I had, I need another box!!) of my ribbons are in my box and I can see all of them poking out through the holes at the end. The problem being I could now see how pretty they were but still had no idea what to do with them. So once again I opened Pinterest to see what I could find. I found a lovely card by Lisa of I'm in Haven which had Happy down the side of the card with ribbons going across the card the same colour as the letters and then birthday stamped at the bottom. Unfortunately I couldn't find the post that the photo was from which is why I haven't linked directly to that post. Here is my card recreated with retired Stampin' Up! supplies.

Stampin' Up! Ribbon Happy Birthday Card

I'm going to give this card to my brother in law but it could easily be changed to be more feminine. I don't feel it's as good as Lisa's but I'm happy with the result and I will be looking for more ways to use up my stacks of retired ribbons so that I can buy some of the ones in the new catalogue.

Thank you for stopping by to read my blog, I'll be back on Tuesday with another card to show you.


Supplies:


Thursday, 12 May 2016

WWYS - Going Global

Morning all, I hope you're having a good week? It seems like a bit of a long one to me but it's not been too bad. I had better warn you now this is a bit of a photo heavy post, sorry! As I said on Tuesday I do love a good challenge blog and I have stumbled across a new one. It's called What will you stamp? and the idea is that each week a different Stampin' Up! set is chosen and the challenge is to use that stamp set. I think this is a great idea as I have so many stamp sets that I bought because I really liked them and then have either used them once or not at all. This weeks challenge is to use the retiring set Going Global, this is actually one of my favourite sets and I'm so sad to see it leaving. I think it is great for those hard to make masculine cards, so if you like it make sure you grab it quickly!


There are so many possibilities with this set and I really love the 'You are my greatest adventure' sentiment and think it goes really well with the compass. Here is what I came up with:

Stampin' Up! Going Global

I often find that when I finish a card I either love it or think it's a bit rubbish, this was one of the rare occasions where I really loved the finished result! The strip of marble effect paper down the middle is just gorgeous and the wink of stella on the compass just finishes it off nicely. It's not often that I brag about one of my own cards but I really do love this one.  

Stampin' Up! Going Global

The marble effect paper was made using shaving foam and re-inkers. I have to admit I bought the re-inkers because I thought I should. Most of my pads have never needed re-inking as they last so well hence why I have been looking for other things I can do with them. This is why I tried out the floating re-inker technique on a previous post (click here to see it) and why I have tried out the shaving foam technique on this card. Yet another technique that I can't believe I haven't done before.


As you can see from the above photo it is so so easy! First you spread shaving foam (must be foam not gel) onto a flat surface, I used a plate, and spread it out until it's roughly flat. Then add a few drops of your chosen re-inkers and swirl together with something thin, I would suggest the thin end of a paintbrush. Don't swirl them too much otherwise you end up just mixing the colours together. Place your card stock in the foam and gently pat down over the entire surface. Using tweezers take the card out of the foam and wipe the shaving foam off. I would suggest leaving it for a couple of mins first so the ink doesn't smudge. Then leave to dry and you end up with a gorgeous marble effect!

I hope you like my card as much as I do and thank you for stopping by to read my blog. If you wanted any of the supplies to make this card then please use the links below to go straight through to my online shop.
Supplies:


Tuesday, 10 May 2016

You've got me

Morning everyone, have you all been enjoying the lovely sunshine we've been having? I have, it's been so nice to be able to get outside in the fresh air with the boys without feeling cold. We even had our first BBQ of the year on Sunday which was lovely. Today's not looking as bright but it's still fairly warm which is good.

I really enjoy playing along with challenges as I often end up doing things that I wouldn't have thought of doing myself. There are so many different challenges available whether it's a sketch, a colour, a theme or even a challenge to use a particular stamp set (this is a new challenge blog I've found which I hope to take part in this week). While searching through all of the different challenges I have bookmarked I found the Fusion Card Challenge which allows you to use either the sketch, the photo or both to inspire your card. This weeks challenge is below:


I really liked the Hummingbird and flowers but didn't really have any sets that I could use to make a card inspired by this. The sketch however I thought I could do.

Stampin' Up! Something to say - Fusion Challenge

Sorry the photo is a little dark the day has turned from not too bright to dark and wet! This card actually started with just the washi tape and evolved from there. I had decided that I wanted to use washi tape as the divide in the sketch and really liked the cute little stars on this one so then everything else had to be stars! I wasn't sure what other colours to use to go with the Hello Honey of the washi so I dug out my good old Color Coach (really wish they would bring this back!) to look up Hello Honey. Pool Party and Basic Grey were suggested and as I don't think I've touched my Basic Grey ink pad since I bought it I thought I would give it a go. They actually go quite well together so I might use this colour combo again! As the light is so poor in the photo I have taken a close up of the sentiment.

Stampin' Up! Something to say - Fusion Challenge

The close up also shows off the Wink of Stella on the stars and the lovely Pool Party glitter ribbon. I hope you like today's card, if you wanted to shop with me then feel free to click any of the photos below which will take you directly through to my online shop. Thank you for stopping by to read my blog.

Supplies:


Sunday, 8 May 2016

Sunday Retirement Showcase - New Baby

Morning all, I am back once again with a card made using retiring and retired products. I will keep going with this theme until I run out of retired products to use up, which could be never! Our neighbours have just had a baby boy and he is absolutely gorgeous! Luckily as little cub is still so little it hasn't made me want another one yet! I bought him a little gift so wanted to make them a card as well.

Stampin' Up! Two by Two

So for this project the stamp I have used (Two by Two) and the DSP is retired and the Regals Designer buttons will be retiring when the current annual catalogue finishes on the 31st May that means that if you want to get any retiring products before they go you only have 23 days left!!


For this one I stamped the image using Memento Ink and then coloured it in using some alcohol markers. I cut a circle out of the centre of DSP and wrapped some of the gold bakers twine round it then stuck it to the card base using Stampin' Dimensionals. I glued the buttons on using the fine-tip glue pen which I think is great for gluing down embellishments like buttons.

As a couple of the products I have used are retiring and there's not much time left to buy the retiring products I thought I would put a supply showcase below of all of the products that will be gone after 31st May. If you want to shop with me please click on any of the images below and it will take you through to my online store. Thank you for stopping by to read my blog.

Supplies:


Thursday, 5 May 2016

Birthday Wishes

Morning all, I hope you are all having a lovely week. I always find a week with a bank holiday in it feels strange, you think it's going to go quickly but in reality it goes really slowly! Still not long until another weekend.

Today's card is such a simple little card which again shows that you really don't need a lot of supplies to make some lovely cards. The It's my Party DSP pack has so many different papers in that this card could easily be changed to use for a male or female recipient depending on what colour cardstock you use as a base. Having said that my sons favourite colour at the moment is pink so he would quite happily receive this card!


This card was made for the Less is More challenge which this week was to use designer paper in a CAS (Clean and Simple) style. I think this card has managed it! I will let you in on a little secret though, you see the silver slimmer card at the top left of the card? That was actually only put there to hide a mistake. I stamped the sentiment up the top and hated it straight away, I had decided from the beginning I wanted it in the middle so I have no idea why I stamped it at the top! I couldn't bear to throw out the card and start again so I hid it, hopefully it adds a little to the card but if I make this card again it will not be featured!

Thanks for stopping by to read my blog. I hope you like what you see and if you fancy shopping with me feel free to click the links below or on the left hand side of my blog.

Supplies:


Tuesday, 3 May 2016

Floating Flower

Morning all, I recently saw a card on Facebook by someone who said they had used the floating re inker technique to create it. I had never heard of this technique but liked their card so thought I would take a look on You Tube to see if I could find a video on how to do this. I'm so glad I did, I love the outcome! For those of you that have never heard of this technique before I took a couple of photos along the way and will try to explain how I did it. Here is today's card:

Stampin' Up! Blended Bloom

I would like to enter my card into two challenges today, firstly the Global Design Project sketch challenge and secondly the Cute Card Thursday 'No Patterned Papers' Challange. This is the sketch that inspired my card


So how did I make it? Well first I chose a stamp that had nice open areas that the colour could go into, I then stamped this onto shimmery white cardstock in versamark ink and heat embossed with white Stampin' Emboss powder. I used the shimmery white cardstock as this is thicker than normal Whisper White and great for water colouring techniques. Once I had heat embossed the image I used the lid of one of my button pots to put a drop of each colour re inker in. You only need a drop as it goes quite far and you can always add more later.


I then placed my card stock into an empty stamp case and spritzed the whole thing with plenty of water. Once the card was wet I took my aqua painter which is also filled with water and starting with the darkest of my colours dropped a small amount of ink into the sections of the flowers. Once I was happy with the dark areas I then continued with the other two colours.


If the cardstock starts to dry just spritz it some more with water. You really need small pools of water in each section for this to work properly. As I was cutting out my image once finished I wasn't worried if I went outside of the embossing. Once finished colouring all of the flower I used some tissue to soak up any areas that I felt had too much water in and then left it to dry.


I hope you agree that the finished flower is gorgeous!


 With this technique you are going to get a completely different outcome each time. I'm now looking for more stamp sets I can use with this! As usual the supplies I have used are shown below, both the Blended Bloom stamp and the Greetings thinlit dies are on the retirement list. Thank you for stopping by to read my blog.

Supplies:


Sunday, 1 May 2016

Sunday Retirement Showcase - New Home

Morning all, I am back again this week with another card using retiring/retired products. I've realised that I have far too many retired products that have just been sitting there doing nothing since they retired, some of them several years ago! I am really pleased I decided to do this weekly retirement showcase as it means I've been getting out all of my old products to have a play with.

My brother in law and his girlfriend recently got the keys to their very first house together so I wanted to make them a new home card. I've made a couple in the past but wanted to do a new one rather than re make something I had already done. I have several sets with houses in them so came up with several ideas but nothing really jumped out at me until I found this card by Robin Feicht by doing a Google search. I really liked that it didn't appear particularly feminine or masculine, it was fairly neutral which meant it would be great to give to a couple. I have to admit when I bought the Welcome Words stamp set I only bought it because I liked the stamp welcome (that I haven't used yet....) and completely overlooked the fact that it had home or a house stamp in it.

Stampin' Up! New Home Card

This stamp set has a lot more possibilities than I initially realised but it is retiring when the new annual catalogue comes out. You may well see it pop up more on a Sunday. The little houses with the smoke heart coming from the chimney is just so cute. 

As we are giving them a gift card as a moving in present, so that they are able to go and choose something they like to put their own mark on their new home, I made a coordinating gift card holder. I love how easy these are to make with the dies and then just embellish them a little (or a lot). It doesn't take long and it means that your gift can coordinate with you card.

Below in my list of supplies I have included all of the products that you can currently still buy. I you would like to know any of the other products that I have used to make this card please drop me an email and I will happily let you know.

Thanks for stopping by to read my blog.

Supplies: